2-4 Week Build Time
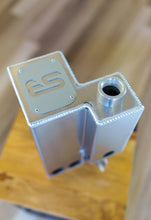
Every component of the Snowbound Customs Aluminum Washer Fluid Relocation Reservoir is 100% sourced in the USA using the highest quality materials. The reservoir features over 4 Liters of fluid capacity and is the only reservoir on the market that does not sacrifice capacity. It is also the only reservoir to integrate the factory washer fluid level sensor and headlight washers depending on trim level. Each one is meticulously crafted with hours of work going into laser cutting/bending aluminum sheet, CNC machining our billet aluminum caps and finally, TIG welding the pieces together with one of the best TIG welders in the nation (seriously, take a close look at the welds on these!)
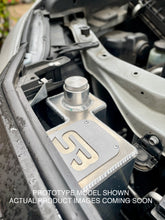
Our washer fluid relocation reservoir is a complete replacement that sits out of sight behind the grille of your vehicle. This allows you to keep precious engine bay room for other mods. A tall filler neck allows the cap to come through the plastic engine bay cover for easy access.
Why should I relocate the factory reservoir?
There are two primary reasons for relocating the factory reservoir.
Reason 1: Functionality
The location of the factory reservoir presents two issues. Larger tires, generally around 35", will rub on the washer reservoir. A large enough impact will crack the plastic and cause highly toxic washer fluid to leak into the environment. Washer fluid is largely comprised of methanol with as little as two tablespoons being enough to kill small children or pets.
The reservoir is also completely exposed when adding a high clearance bumper. You will notice that the hoses, wires and pumps are all located at the front of the reservoir which makes it easy for a tree branch or ill-placed rock to break something.
Reason 2: Aesthetics
Many people get rid of the factory reservoir because they do not like the look of it after adding high clearance bumper. It is completely exposed and can be an eyesore to look at!
Product Options
Headlight Washers
Different trim levels of the GX 460 come with different options but don't worry - we have you covered no matter your needs! All models have two primary pumps to power the front and rear windshield washers along with a washer fluid level sensor. Higher trim models will also have headlight washers. Don't know if you have the headlight washers? It's easy to check. Models with headlights washers will have the rectangular shaped object shown in the image circled in red.

Please note that you will need to extend the headlight washer pump wiring by approximately 8". This is a relatively easy task that can be accomplished in a few minutes.
Product Specifications
- Fits 2014+ GX 460
- Over 4 Liters of fluid capacity
- TIG Welded Aluminum
- Billet 6061-t6 aluminum cap with stainless steel vented cap
- Bolts directly to factory holes behind grille
- Includes mounting hardware (3 bolts/3washers)
- Uses factory pumps and connections
- Holes for two main pumps, fluid level sensor and headlight washer pump (if selected)
Install Instructions
GX460 install instructions:
1. Remove factory reservoir
1a. Remove or reposition fender liner covering the factory reservoir.
1b. After gaining access to the reservoir, place bucket below reservoir and remove visible pumps to drain fluids. Be gentle and use a back and forth motion to help them come out. You may use a flat head screwdriver to help you by prying from underneath them. Save all gaskets. You will be reusing these.
1c. Remove 3 bolts holding the factory reservoir and remove filler neck from the top by squeezing the plastic tabs to fully remove the reservoir. Lower reservoir until you have access to the backside of it. Remove the low fluid sensor from the backside of the factory reservoir. Unplug and remove computer module from reservoir by lifting plastic tab with a flathead screwdriver and pushing it out. Relocate this module to a safe place.
2. Prep new reservoir
2a. After removing all gaskets from the factory reservoir, place them in your new reservoir. The bottom two holes are for the main pumps. The smaller hole above the mean pump holes is for the headlight washers (if your trim level has this) and the medium sized hole on the smaller tank section is for the low fluid sensor.
2b. Mount low fluid sensor to new tank. Do not mount pumps to the new tank yet. These are attached to the car with hoses and should not be removed. Reroute the pumps towards the new tank location. You will need to remove clips holding the hoses and wires in place to allow them to move. Of the two main pumps, one pump will reach farther. This pump will go to the farthest hole on the new reservoir.
2c. (Model Specific - skip this step if you do not have headlight washers) The headlight washer pump wiring harness is shorter than the others. The wiring will need to be extended to reach its new location. Extend wiring by about 10" (wiring not included). Using 16-20awg wire, extend the two wires and verify that they will reach the new location.
3. Mount reservoir
3a. To position the reservoir in its new location, the front grille or bumper will need to be moved out. We recommend doing this installation while you are doing a high clearance bumper install since it will allow for much easier access. The front grill will need to be pushed outwards at the top to allow the new reservoir to be put into its place. You do not need to remove the entire bumper. You only need to loosen it enough to place the new reservoir into position. Please refer to this link for instructions on loosening the front bumper: https://youtu.be/JdvmicppfKI?t=96
3b. Remove top mounting bolt holding in the AC line and lift plastic bracket out of its hole by squeezing the tabs to release AC Line. This will allow for some extra clearance to get the reservoir into its new place.
3c. There is a large plastic air duct in the location of the new reservoir. Remove this. It will not be needed again.
3d. Do not mount the reservoir yet. First, put reservoir into position and mount all pumps. At this point, the gaskets will likely have dried out making it much harder to install the pumps. Apply soap and water to the pumps and gaskets before installing and they should easily slide into place. After mounting pumps to the reservoir, you may mount the reservoir to the car using the supplied hardware. Align rivets on the reservoir with holes on the vehicle crossmember and insert the bolts/washers. Do NOT over tighten these bolts.
3c. Install cap onto reservoir. You may want to apply grease to the aluminum cap threads to provide for smooth operation for years to come.
4. Reinstall all removed components and tidy up wiring. Cut a hole using a hole saw in the radiator cover to allow easy access to your new washer reservoir.


